The Game
Steel Circus is a futuristic ball sport with MOBA or “Hero Shooter” elements. Each champion has two unique skills, such as placing defensive walls or stunning enemies. There’s no automatic passing – passing the ball requires precise aiming. Players also need to manage their stamina, which is used for sprinting, tackling opponents or making quick dodge maneuvers when you have the ball.
Background and Scope

We originally designed the bots as backfill for human players leaving in the middle of a game. When Steel Circus launched, we were fortunate to receive a main header feature on Steam, which brought in droves of new players for the week that it was active. However, many of these players decided to quit the game during their first match, which ruined the game for everyone else. While we had anticipated this could be a problem, the scale of it surprised us.
We worked on various ends to mitigate the issue (such as matchmaking), but in the end, we felt that adding bots to the game as soon as possible was our best bet for improving first time players’ experience and budgeted three weeks during an already hectic launch month to implement them. In the end, it took about 90 hours from start to initial release to write the AI.
This meant I had very little time to backtrack or experiment and had to rely on techniques I knew would work well enough.
General Advice
I hope if you find yourself in a similar situation, these posts will offer some help. I think one of the main takeaways is that you often don’t need fancy ingredients (such as behaviour trees) to get decent AI on a budget. The state machine that powers Steel Circus’ AI is really basic. Most of the more complex behaviours arise from evaluating influence maps, which are really the heart of our AI and have been around forever.
My main advice, if you’re not specialized in writing AI, is to start with a basic sensorium, a set of low level helper functions that you can easily test and that will become the building blocks for higher level abstractions. I spent about the first quarter of the time on just that – utility functions for predicting where the ball would travel, which player would be in the best position to intercept it, where to shoot to score a goal or make a pass, threat evaluation, and so on.
These helper functions didn’t have any decision making logic by themselves, but their output was easy to visualize, and I could play an actual match against other people on the team while recording the debug output on my screen, and then go back and verify that my functions were doing what they were supposed to do. Higher level AI tends to be much more difficult to debug (or at least needs an order of magnitude more time on debug visualization code), so it helps a lot to make sure your foundations are solid. For me, it also helps a lot to not have to deal with implementing low level code when you’re trying to focus on higher level behaviour. Not all of the helpers I wrote ended up being used by the AI, but I think getting them out of the way saved me lots of time and headaches.
Another piece of advice is that, particularly if you’re on a shoestring budget, screen recording software and printing AI state to an on-screen console are your friends. After the low level sensorium, the first thing I built was logic to make a pass or shoot goals. I set it up so that I could have this logic take over my character’s aim while playtesting with the rest of the team (favourite moment: a colleague who didn’t know the AI had taken over and shouted “Nice pass!”), and it would output every piece of internal state I could think of to a little window in a screen corner (I could have output to Unity’s console, but our console logs are full of other data, and the Unity console actually updates with a lower frequency than the main render loop!). Screen recording ensured that if I caught an edge case, I could go back and look at the AI’s state during that situation and the preceding simulation ticks, which is often much more meaningful than breakpoints or long lists of logs.
Basic Concepts / High Level Overview
We’ve already touched on the helper functions / basic sensorium upon which the higher level AI is built. The bots in Steel Circus create the same sort of input that other players do (i.e. they set “joystick” directions and “button” states). Building on the helpers, it was easy to write a simple AI stub that would pass and shoot goals, by just controlling my aim and throw button whenever I held the ball. The logical next step was to deal with positioning while holding the ball.
Steel Circus is a team sport, so positioning is one of the main skills that differentiates good players from bad ones. If you have the ball, you want to generally move towards the enemy goal, or positions where you can get a clear shot at it, while, among other things: avoiding bumpers, really avoiding enemies, not standing too close to other team mates, keeping clear pass lines to team mates, not standing too close to the edges of the field. The qualifiers here (“not too close”, “really avoid”) are important. Steel Circus is less about complex path finding and more about traversing the field by moving from one position to a nearby one that’s a bit more advantageous. Influence maps are great at that.

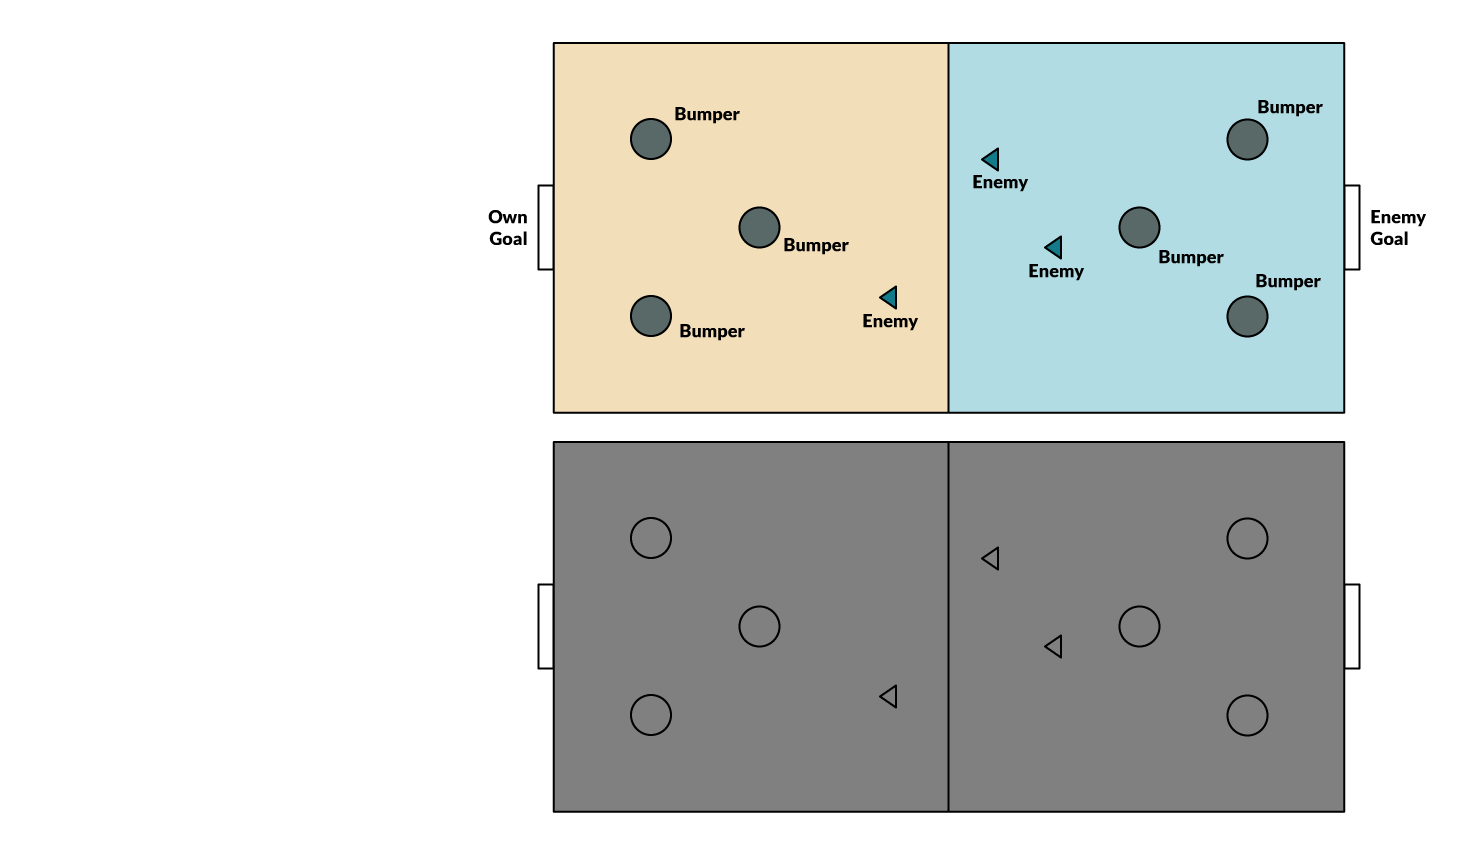

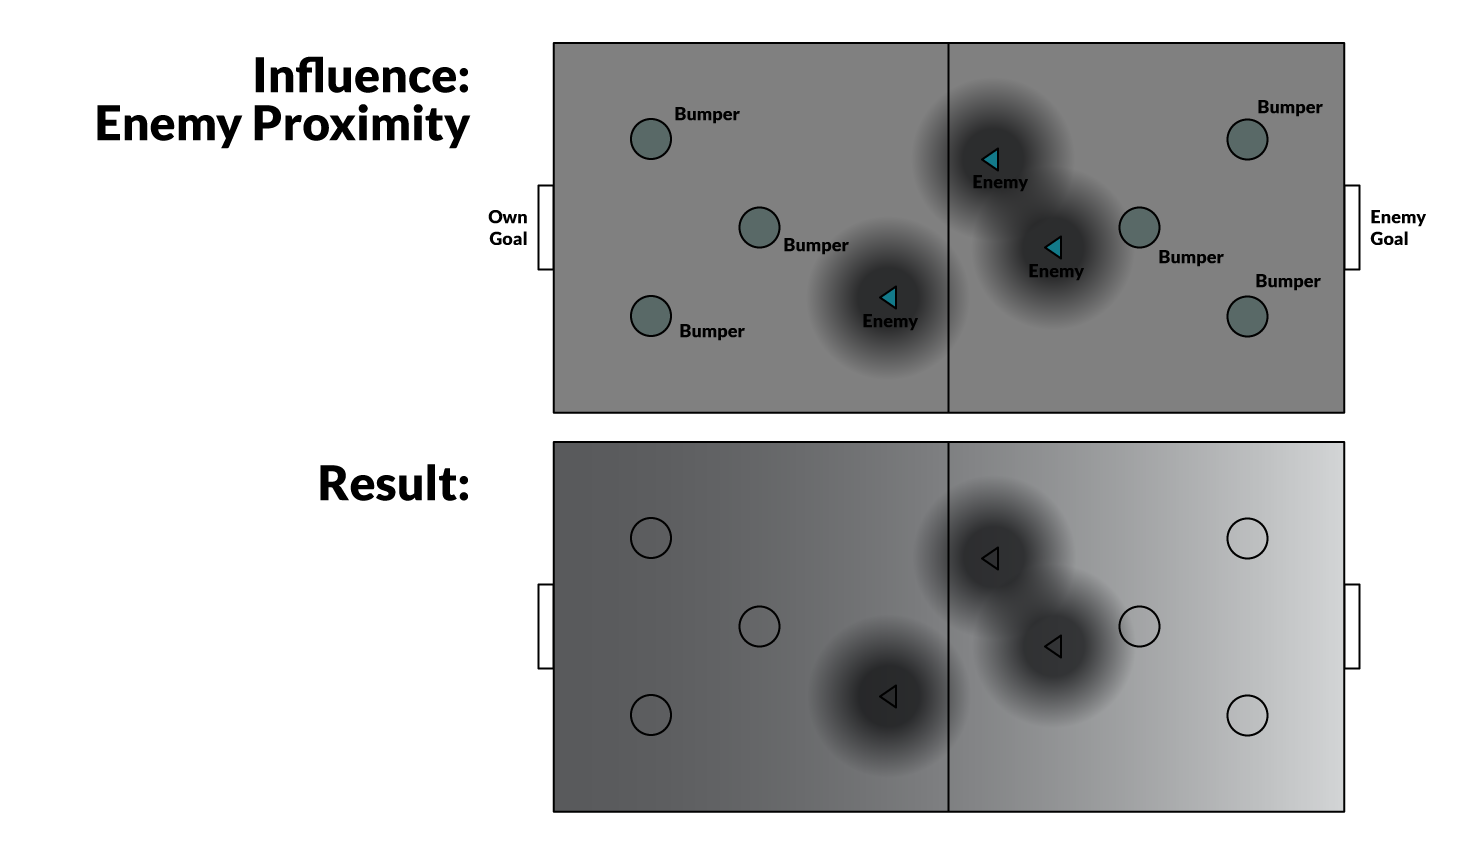


Assembling an influence map from various gradients: Resulting scores after each step are shown on the bottom. Higher-score regions are brighter. Note that this is a grossly simplified version of the gradients we use in the game.
Influence maps are like heat maps – you define gradients for bad or good locations, hotter or colder, if you will. You can then sample pseudo-random nearby points and evaluate their “score” to figure out where to move next. I’ll go into more details on how an influence map for a particular state was set up in the next post, for now I’ll just say that it made positioning for ball ownership a breeze: all I had to do was guesstimate gradients for various factors (enemy proximity, goal proximity and so on), then have a debug AI that would print evaluations of my current position to my onscreen console, watch the score as I moved along the field, and tweak the gradients. It was then trivial to write movement code that sampled pseudo-random points around my character and determined its next target position. I’d let the movement code take over my character and watch how it’d perform in different situations, until it could deal well with enemies in its way.
To a large degree, states other than ball ownership also rely on influence maps for positioning. If a team mate has the ball, many of the same rules apply, with slightly different weights. Beyond that and the basic state machine (with the main states being ball ownership, team mate ball ownership, enemy ball ownership and free ball movement), the major missing pieces are a central AI cache to speed up common queries and a simplified collision system to further boost performance. I’ll go over the details in the next posts.
Part 1: Overview
Part 2: The FSM and Ball Ownership
Part 3: Other States
Part 4: Optimization and Future Work